

Full tutorial video can be found here
- In Drawing Mode, select a box around the whole of an object. It will show the central point in the middle, allowing you to place the pivot point in the direct centre. In the case of the pupil etc, when you want to enlarge the entire object; in Camera View you can shift-drag the object at one of the corners to expand it equally in all directions
- Usually no need to separate iris, pupil and highlight unless going into great detail.
- To peg together pupil, iris and highlight: add a blank peg layer onto the pupil layer. Open Network View. Connect the 'pupil peg' module to the pupil, iris and highlight. Now can animate all together with peg selected (shown in green below)

- To cut the iris off at the edge of the eyeball: Select the eyeball layer. Go into Drawing View. In the 'module library' > 'effects.' Hold down Alt and drag the 'colour override' module onto the network view, and place it on the line connecting to the 'eyeball/eyelid' (shown on right below)

- Click on the little white box in the left corner of the Colour Override module. The Layer Properties dialogue box/window will come up. Select the colour of the eyeball from your palette, and drag and drop into the 'Render Selected Colours' panel at the bottom. Make sure the check-box is CHECKED.Click 'Close.' In Action View now you will only see the white of the ball, not the line around it.


- Open up the 'effects' panel again. Select the 'cutter' tool, and drag it into the Network View box. Alt-click and drag it so that it connects to the Iris module from the RIGHT input, then take the Colour-Override module and connect it to the LEFT input. It should look like below.
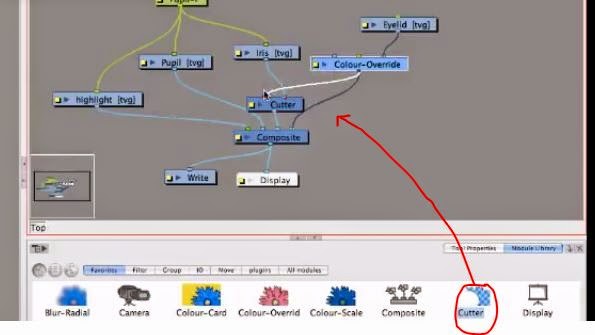
- Click on the little white box in the left hand side of the Cutter module. Click on inverted. In the Action View, you should see the Iris visible within the confines of the eyeball.
- To make the same happen to the Pupil and Highlight as well as the Iris, select the 'composite' tool from the effects panel, and drag it into the Network View box. Connect the Iris, Pupil and Highlight all into the Composite module at once. Click on the little white box on the left side of the Composite module, and select the 'Pass Through' option. Close the dialogue box. Plug the Composite module into the right hand input of the Cutter module.

- Remove the plug from the Colour Override module to the Composite module. In its place, plug the Eyeball module into the Composite module. It should now be complete.

NOTES: watch the last 5 mins of eyeball rig video part 2 for swiveling the iris and for making the eye blink.
TIPS: Never make any whites pure white or blacks pure black in an animation - like impressionist paintings, it looks better if it's ever so slightly off-colour.