
Showing posts with label YouTube. Show all posts
Showing posts with label YouTube. Show all posts
12 January 2015
Inspiration: Random Little YouTube Animation
This video is gorgeous, and the painting looks liek it could have been done by hand in photoshop or something! I love this aesthetic, it looks delicate which contrasts beautifully with the intense action.

5 January 2015
The Making of Beauty and the Beast
Unlike the 'Making of Sleeping Beauty' video, this one delves deeper into the issues concerting the adaptation of a fairy tale to become an animated feature film. It compares the original folk story and the adapted version. The story team working on the film changed the character of Belle by fleshing her out; making her more humble and quirky. They created new characters to expand the story further from the original. Comedy is added to a gloomy story, as well as commentary, in the form of the Beast's servants. the villain, Gaston was added to thicken the plot. He acts as a foil for Beast.
This video focuses a lot more on the character design and development rather than the concept art and background design.
This video focuses a lot more on the character design and development rather than the concept art and background design.
The Making of Sleeping Beauty
This video that I found on YouTube is amazing. The things I found most interesting to learn of were the medieval tapestries and Persian arts used as reference for the art style; and the amount of live action recording used as source material for the animation. each background took up to 10 days to paint by hand! I can't even imagine trying to do something of that depth for my own animation!
Walt Disney mentions being inspired by the classical music piece 'Sleeping Beauty', but doesn't actually talk in depth about the route of the folktale on which the story is based, and about his decision to adapt it in a certain way.
1 December 2014
University Work: Lip Syncing
One of the artists who I follow on Twitter and Tumbr is an animation student at Teeside university. She posted this online, as one of the videos she had to produce for her course. In it, she practices lip syncing of characters using 2D traditional animation. Apparently it took about ~5 days.
11 November 2014
23 October 2014
After Effects Electrical Text Reveal
I followed another YouTube tutorial by VinhSon Nguyen yesterday; this time how to create an electrical pulse effect to reveal text on the screen. It doesn't have any of the sort of effects or aesthetics which I would like to use in my animation, but it helps me to practice using After Effects and to get more familiar with the controls and interface.
21 October 2014
After Effects Ink Reveal Tutorial
I followed a watercolour reveal tutorial for After Effects on YouTube by the vlogger VinhSon Nguyen, which shows you how to use an ink splat effect (downloaded from http://creativedojo.net/store) to create an opening transition/reveal of an image or video. I practiced just with an image this time, but it has given me an interesting visual option to use for the opening of my animation possibly. The picture I used was one of a lion which I painted nearly a year ago on Photoshop, while following an Aaron Blaise YouTube tutorial.
Link to original tutorial video here
17 October 2014
YouTube Tutorial: Toon Boom Interface
Within the next week, I have decided, I want to watch as many Toon Boom tutorials and tips as possible, so that I can competently use it in our week 5 tutorial class of Animation #2, when we will be practicing character rigging and stuff. My knowledge of Toon Boom is hopelessly inadequate for the task I want to undertake at the moment, so the best thing to do it practice, practice and practice. I'll watch all of the YouTube videos I have time for then do simple exercises with the software.

It reminds me of the Adobe creative suite interface, how you can dock and drag and drop windows to customise the interface to your choosing. The storyboard layout and tools remind me a lot of Adobe Illustrator.
Tip: In Storyboard Pro, go to Preferences > Global UI > Flat Tool Toolbar = enables customisation of the toolbar on the left hand side.
This morning, I'm watching one of the first videos on the Toon Boom Tips page, which teaches viewers about the interface of Animate Pro and Storyboard in three 10-minute long videos. I wanted to pick up some small tricks to speed up my workflow.
Tip: While using Brush tool, hold down 'O' and click and drag the cursor to set the maximum size of the brush stroke (when pressing hard with the stylus) manually. To set the minimum size (when pressing lightly with the stylus) press 'Shift' and 'O'
Tip: when using the Line Tool, hold down 'Shift' to move the line around in straight increments. If using the Brush, hold down 'Shift' to draw a straight line.
ETA: Since the videos must have been made a couple of years ago, a lot of the information they base themselves on is not relevant to the current version of Storyboard Pro, so I have used strikethrough on the above points which are no longer of use.
16 October 2014
The Decemberists 'The Crane Wife'
It was a cold night
And the snow lay low
I pulled my coat tight
Against the falling down
And the sun was all
And the sun was all down
And the sun was all
And the sun was all down
I am a poor man
I haven't wealth nor fame
I have my two hands
And a house to my name
And the winter's so
And the winter's so long
And the winter's so
And the winter's so long
And all the stars were crashing 'round
As I laid eyes on what I'd found
It was a white crane
It was a helpless thing
Upon a red stain
With an arrow its wing
And it called and cried
And it called and cried so
And it called and cried
And it called and cried so
And all the stars were crashing 'round
As I laid eyes on what I'd found
My crane wife, my crane wife
My crane wife, my crane wife
Now I helped her
And I dressed her wounds
And how I held her
Beneath the rising moon
And she stood to fly
And she stood to fly away
And she stood to fly
She stood to fly away
And all the stars were crashing 'round
As I laid eyes on what I'd found
My crane wife, my crane wife
My crane wife, my crane wife
[2]
My crane wife arrived at my door in the moonlight
All star bright and tongue-tied I took her in
We were married and bells rang sweet for our wedding
And our bedding was ready when we fell in
The sound of the keening bell
To see its pain erect
Soft as fontenelle
The feathers and the thread
And all I ever meant to do was to keep you
My crane wife
My crane wife
My crane wife
We were poorly, our fortunes fading hourly
And how she vowed me, she could bring it back
But I was greedy, I was vain and I forced her to weaving
On cold loom, in a closed room, with down wove
The sound of the keening bell
And to see its pain erect
Soft as fontenelle
The feathers and the thread
And all I ever meant to do was to keep you
My crane wife
My crane wife
There's a bend in the wind and it rakes at my heart
There is blood in the thread and it rakes at my heart
It rakes at my heart
My crane wife
[3]
And under the boughs unbowed
All clothed in a snowy shroud
She had no heart so hardened
All under the boughs unbowed
Each feather it fell from skin
Till threadbare while she grew thin
How were my eyes so blinded?
Each feather it fell from skin
And I will hang my head, hang my head low
And I will hang my head, hang my head low
A gray sky, a bitter sting
A rain cloud, a crane on wing
All out beyond horizon
A grey sky, a bitter sting
And I will hang my head, hang my head low
And I will hang my head, hang my head low
3 October 2014
YouTube Tutorial: Rough Frame-By-Frame Animation in Toon Boom
Toon Boom Tips #44 Frame-By-Frame Rough Animation
This tutorial is an introduction to frame-by-frame animation in Toon Boom, utilizing the Xsheet. It's a really great simple intro to the techniques used in frame-by-frame, illustrating how to animate a basic head turn by creating two keyframe poses, breakdowns and in-betweens.
SHORTCUTS: F and G keys to switch forward and back between frames
2 October 2014
The Fall of the House of Usher (1928)

 |
| What is this? |
30 September 2014
YouTube Tutorial: Eyeball Rigging in Toon Boom

Full tutorial video can be found here
- In Drawing Mode, select a box around the whole of an object. It will show the central point in the middle, allowing you to place the pivot point in the direct centre. In the case of the pupil etc, when you want to enlarge the entire object; in Camera View you can shift-drag the object at one of the corners to expand it equally in all directions
- Usually no need to separate iris, pupil and highlight unless going into great detail.
- To peg together pupil, iris and highlight: add a blank peg layer onto the pupil layer. Open Network View. Connect the 'pupil peg' module to the pupil, iris and highlight. Now can animate all together with peg selected (shown in green below)

- To cut the iris off at the edge of the eyeball: Select the eyeball layer. Go into Drawing View. In the 'module library' > 'effects.' Hold down Alt and drag the 'colour override' module onto the network view, and place it on the line connecting to the 'eyeball/eyelid' (shown on right below)

- Click on the little white box in the left corner of the Colour Override module. The Layer Properties dialogue box/window will come up. Select the colour of the eyeball from your palette, and drag and drop into the 'Render Selected Colours' panel at the bottom. Make sure the check-box is CHECKED.Click 'Close.' In Action View now you will only see the white of the ball, not the line around it.


- Open up the 'effects' panel again. Select the 'cutter' tool, and drag it into the Network View box. Alt-click and drag it so that it connects to the Iris module from the RIGHT input, then take the Colour-Override module and connect it to the LEFT input. It should look like below.
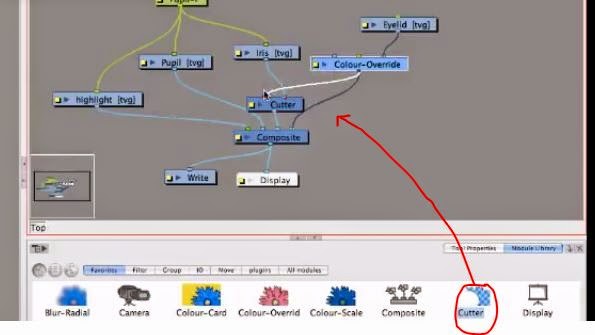
- Click on the little white box in the left hand side of the Cutter module. Click on inverted. In the Action View, you should see the Iris visible within the confines of the eyeball.
- To make the same happen to the Pupil and Highlight as well as the Iris, select the 'composite' tool from the effects panel, and drag it into the Network View box. Connect the Iris, Pupil and Highlight all into the Composite module at once. Click on the little white box on the left side of the Composite module, and select the 'Pass Through' option. Close the dialogue box. Plug the Composite module into the right hand input of the Cutter module.

- Remove the plug from the Colour Override module to the Composite module. In its place, plug the Eyeball module into the Composite module. It should now be complete.

NOTES: watch the last 5 mins of eyeball rig video part 2 for swiveling the iris and for making the eye blink.
TIPS: Never make any whites pure white or blacks pure black in an animation - like impressionist paintings, it looks better if it's ever so slightly off-colour.
Subscribe to:
Posts (Atom)